Thursday 29 December 2016

Beautiful You - Celebrate In Style...


Hello and welcome. Thanks for visiting my blog today. We are being highlighted internationally by Kylie Bertucci and you are able to VOTE for my project. The top ten winners will get to be part of an International blog hop so please vote for my project. You can do that here.

Our theme for this highlight is Encouragement, as we all need a kind word said to us to build us up.

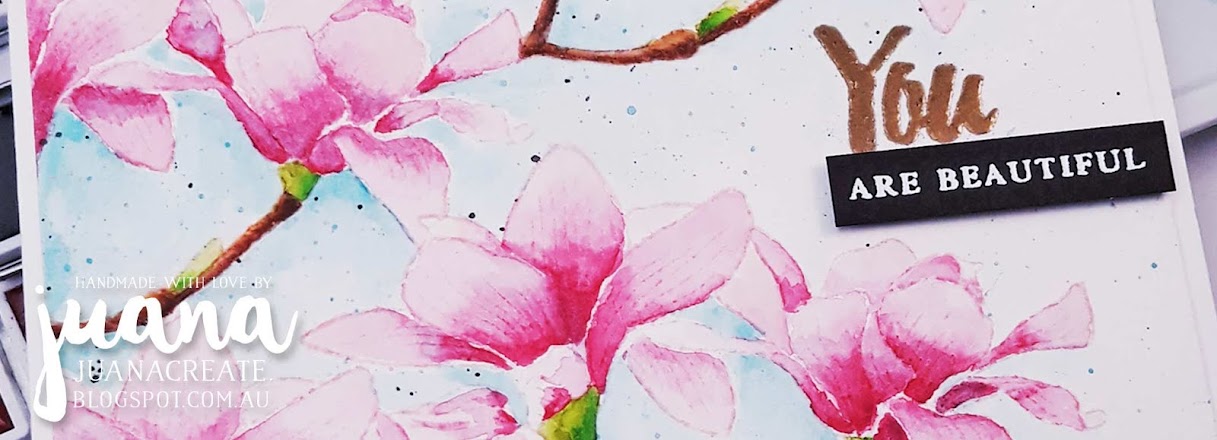
The cards that I'm showcasing, is the "Beautiful You" stamp set from the new Occasions catalogue. It will be available to order on 4th January 2017. It's a fabulous set filled with many sentiments of encouragement as well as gorgeous outlined illustrations that are great for any colouring mediums.

Celebrate In Style!


Illustration has been watercoloured using an aqua pen with Zig Clean Color Brush markers, as I love the vibrant colours of these markers and blend so easily. I have cut out a part of the image for interest and to also highlight the In Style sentiment that has been white heat embossed on black cardstock.

Cardstock:
• Arches watercolour paper medium 185gsm
• Elegant Eggplant, Rose Red and Basic Black
• Sequins added to compliment design in coordinating colours


The same layout has been added to the inside of the card but minimised the layers.

The font combination and the image goes so well together.


Wishing You Brighter Days To Come


Kraft cardstock has been used to compliment the illustrative qualities of the image, by using Whisper White watercolor pencil part of the new Watercolor pencils available in the Occasions catalogue. I have also used Basic Gray watercolor pencil for shading.  The images has been stamped with Versafine Onyx Black Ink and have clear heat embossed afterwards as it not only helps to dry the ink quicker being a pigment ink but gives another interest to the image.

The sentiment has been white heat embossed. The rainbow panel on the edge as well as on the inside of the card has been ink blended and helps give hope in the end. Colours used are, Daffodil Delight, Peeakaboo Peach, Real Red, Elegant Eggplant, Pool Party and Tempting Turquoise.


Life is a Dance


This card layout is similar to the first one, however have white heat embossed the images on the black cardstock  to give it a reversed effect. Zig Clean Color brush markers have been used again on both the front and inside of the card.


I have masked the image by using painters tape to give a defined edge around the image after water colouring it in. So Happy For You has been added to compliment the image. 


I hope you have enjoyed my cards and found inspiration. The Beautiful You set and the cards you can create will surely brighten anyone's day and bring a smile to the recipient's face thanks to the lovely images and sentiments that this set offers. You can purchase this set as well as the new Watercolor pencils on my online store in Australia, on 4th January 2017 by clicking on the Shop now button or here.

Thanks for visiting my blog today make sure you head over to Kylie's blog - to vote for my project. I would love to be chosen to do an international blog hop.


Happy Crafting! :)


Sunday 18 December 2016

Special Reason bundle Sneak Peek


Hello and welcome. Here's a sneak peek of the gorgeous Special Reason bundle from the new 2017 Occasions catalogue. I love the images in this set and the Stylish Stems framelits dies makes this a delight to use. You can make the most wonderful floral arrangements using both the positive and negative die cuts allowing more use of the set and endless creativity. 

I have been inspired by the Global Design Project #66: Sketch Challenge for the lovely layout on the banner below. I was particularly drawn to Kylie Bertuccie's gorgeous card (pictured below) using the die cut window using the Window Shopping Box Thinlits dies also from the new Occasions catalogue and have Cased her idea. I have used the the intricate flower die from Stylish Stems framelits dies from the bundle. It's such a stylish design feature using the negative space. 


The Special Reason bundle comes with the Special Reason Stamp set in both clear and wood mount and the Stylish Stems Framelits Dies. It's available to order 4th January 2017. It's also Sale-A-bration and with a qualifying order together with this bundle you'll be able to get a free item so it's an awesome time to purchase.


Here's my card using the beautiful floral images from the set inspired by #GDP066 Sketch Challenge. A simple and clean layout and came together quite easily. 


The die cut flowers have been stamped using Calypso Coral, Peekaboo Peach, Daffofil Delight and Wild Wasabi for the leaves. The leaves are just wonderful as it cuts very closely leaving no white edges, it looks almost life like.

The panel behind the larger die cut flower window has been ink blended using Pool Party and Tempting Turquoise directly on to the card base, ensuring that it shows through behind the die cut window panel.

Bermuda Bay bakers twine has been used to tie around and to hold the cute banner label die cut in vellum from the set. The sentiment has been stamped in black Stazon on ink.


More of the gorgeous flowers from the set follows through to the inside of the card. I have used and die cut the large banner with the coordinating border image and used the rest of the sentiment to complete it.

Stampin' dimensionals have been used to raise up the flower and banner. Sequins have been randomly placed to compliment the design. Clear Wink of Stella has also been applied on the flowers but does not show too well in the photos, it looks so much better in person hehe. 


I hope you have enjoyed my card and have found inspiration, I would love to hear you thoughts. Also please check out the creative projects over at Global Design Project for more creative inspirations. Hopefully you'll join in the fun!

Thank you so much for stopping by and hope to see you next time. Happy Crafting! :) 


Friday 16 December 2016

Thanks a Bunch - Basket Bunch bundle


Hello and welcome. I'm so excited to share a sneak peek of the Basket Bunch bundle from the new Occasions catalogue. It is on page 18 and has the most adorable images including the bunny rabbit and many more. The great thing with this bundle is that it comes complete with the coordinating dies, which makes it easier and fun to die cut. I just love this set and it's perfect for coloring in any style you like. 

The bundle is themed around Easter but can also be used as a Thank you card. Today's card features a Thank you card that can be made with this lovely set. I love daffodils and after seeing the basket and the bunny rabbit, it was love at first sight hehe. The images in the set reflect Spring with new life and new beginnings and have used bright and vibrant colours. 

Here is a pic of  the Basket Bunch bundle with the Thank You card, along with the stamped and coloured images. 


I have used both Stampin' Up inks and Kuretaki Zig Clean Color real brush markers, and they are just divine to use. 

All the images except for the background and grass, have been coloured in with Zig Clean Color markers. The colours are so vibrant and blends so well, these markers are also designed to use as watercolours. Here I have used them as normal markers and the results are just fabulous don't you think? 

The background has been ink blended using Soft Sky to give a soft gradient. This was achieved using a round mini ink blending tool.  I have also added the white heat embossed splatters from the Gorgeous Grunge set for an extra interest and texture.

The die cut grass has also been ink blended using Mint Macaron and Cucumber Crush inks.

The sentiments has been white heat embossed on basic black cardstock and has been die cut out with the pennant banner from  Bunch of Banner Framelits.

The stitched border panel has been die cut using the Stitched Rectangle die from Memory Box and this has been layered and have mounted the top layer with fun foam for an even raise. The panel underneath has the same ink blending applied to it. 

The images are so much fun to colour and having the matching dies makes this set a breeze to use. Here are the coloured images ready to be die cut in the Big Shot, how easy is that?


Once all the pieces have been die cut simply arrange to the desired layout and adhere with dry adhesive, I have used Tear and tape. I have used Stampin' dimensionals to raise up the flowers, basket grass, bunny rabbit and sentiment banner.

Here are the pics of the card front...


Inside the card, I have used the sentiment, 'You Made My Day...' and the die cut daffodil flower just makes it all happy and sunny. The background has been achieved by die cutting a square on a large post it note and using the negative as a mask. I have used Soft Sky and Mint Macaron ink blending similar to the front. This card was made to give to a friend to say thanks for their generosity. 


I hope you have enjoyed and found inspiration. I would love to hear your thoughts. This bundle is going to be a personal favourite of mine, as it can be coloured in and has the matching dies - with picture perfect results! hehe.

The bundle is available to order on 4th January for customers when the new Occasions catalogue is released. You will want to get this bundle for sure and it's almost close to becoming a qualifying order to get a free item from Sale-A-Bration by purchasing another item.

This card has been entered in this week's Crazy Crafters team projects highlights. Be sure to check out all the creative projects and remember to vote for your favourites. I hope the little bunny rabbit with his lovely basket of flowers will get your vote. Thanks a bunch hehe. :) 


Thank you so much for stopping by and hope to see you next time. Happy Crafting! :)

Products used:

• Basket Bunch Bundle

Sunday 11 December 2016

Crazy Crafters Blog Hop with special guest Lisa Curcio


Candy Cane & Cookie Cutter Christmas spinner card


Hello and welcome to the Crazy Crafters December Blog Hop. We are so honoured to have a very special guest Lisa Curcio from the US joining us. As part of the hop we get to CASE (Copy and Selectively Edit) any card or project by Lisa. 

As it's the festive season, I have cased Lisa's Reindeer card above. There is a great moral story behind this card from Lisa's experience, that we should salvage and send all imperfect cards to family and friends regardless as they wont notice the little things that we notice as imperfect, and will appreciate the thought and effort that went into it. Click here to see Lisa's post on her "Save the Reindeer" card post. 

It's also a great opportunity to finally get to use this set in time for Christmas. The layout from Lisa's card with the string on the reindeer's antlers and window panel inspired me to create a spinner card with the images using the Cookie Cutter images suspended on a string and have them back to back that can be seen as it's spinning. I appropriated this wonderful and ingenious card idea from Laura Bassen

The string mechanism has been created using the thick whisper white bakers twine and separated the twine and used the thin strands almost like fine sewing thread. This works well to twist and turn and once released spins very well. Below is a pic of the thin strand of bakers twine and how it's put together.


All images except for the ginger bread man and Santa, has been lightly watercoloured using an aqua painter in Real Red, Crumb Cake and Early Espresso. These colours has been inspired by the Global Design Project #65 - Colour Challenge. There are so many creative projects to be inspired by using these colours. Be sure to take a look and join in the fun!


The ginger bread man has been stamped with Early Espresso and Santa's red outfit and belt have been coloured in using Real Red and Basic Black Stampin' Up! markers. I have also coloured in the Santa using an aqua painter, though the red is not as vibrant. 

Photopolymer stamps requires a bit more attention before use especially block images. It's best to prep the stamp with versamark ink and wipe it and have a practice run with ink on scrap paper before using. The more times you stamp with it, the better results will be.

Here are the four spinner cards:


Patterned papers used are from the Candy Cane Lane designer series paper and perfectly coordinates with this set. 

The window has been created using the circle and scallop dies from Layering Circles Framelits

The sentiments has been stamped and later cut out using the 1" circle punch and the banner from Bunch of Banners Framelits. They are mounted using Stampin' dimensional to give it raise. 

'Put on a happy face' sentiment, has been white embossed on Early Espresso cardstock just to make it pop. 

I have made quite a few of these cards to send for Christmas and can be easily mass produced thanks to the coordinating Cookie Cutter builder punch. The colouring does take some time but remember it doesn't have to be perfect hehe. The malformed can always find grace in our cards lol.  


Here's a quick clip of the spinner card in action! :) 

Make sure you continue to hop all the way around and see all the amazing inspiration from the Crazy Crafters team. You are going to love what our team have come up with using Lisa's cards. Currently you are at my blog: Juana Ambida - so check the list to see who is up next. Enjoy!

Thank you so much for stopping by and hope to see you next time. Happy Crafting! :) 

Products used:


Thursday 1 December 2016

Mediterranean Moments with Suite Sentiments

Hello and welcome back. Today's card's have been inspired by this week's Global Design Project - Case the Designer and what I have taken from Connie Collin's gorgeous card is the beautiful watercolouring and vibrant colours. 
There is a gorgeous new stamp set from the new 2017 Occasions catalogue called "Mediterranean Moments".  It's perfect for colouring with any mediums and just couldn't wait to try using watercolours with it. It's a stamp set designed by Susan Nygaard and depicts four lovely illustrations from her travels in Europe. It would make a wonderful Project Life memory keeping with the travel theme as well as card fronts reminiscent of postcards. 
I have teamed the images with another new set "Suite Sayings" which was a free set I received for being at Onstage Live in Brisbane. It has many great sentiments that can be used for many occasions. The Suite Sayings actually coordinate with quite a few sets from the Occasions catalogue and have matched the most appropriate to each scene. 


Global Design Project #064 | CASE the Designer


Here is a close up of each card:

Each image has been watercoloured on watercolour paper and have been die cut using the new Stitched Shape framelits dies. It has then been mounted on with fun foam for an even raise.


The left border panel has been created using Diagonal Stripes by white heat embossing and doing an ink blending resist with Pool Party and Blushing Bride inks. The sentiment has been stamped on another Whisper White cardstock panel and have wrapped a linen thread around it. 


The sentiment on this card has been partly stamped and only Congratulations has  there. 


The last card, I have used the cute envelope die from the Sending Love suite as it coordinates with the sentiment. It goes well with the overseas travel feel of this scene. I have used vellum for  the envelope so that the sentiment can be seen inside and shows a bit of the background. I love how you can take out the sentiment from the envelope.

I hope you have enjoyed this card as much as I had creating it and have found inspiration. Why not give the Global Design Project Case the designer challenge a go? There's so many wonderful and creative cards on there to be inspired by. 

Both sets I have used will be available to order on 4th January and is a great set to have if you love to colour for therapy. If you have any question please message me or comment below, I would love to hear your thoughts. 

These cards have also been entered in the Crazy Crafters Team Project highlights. 


Thank you so much for stopping by and hope to see you soon. Happy Crafting! :)