Monday 21 August 2017

Stamp Review Crew - Window Shopping


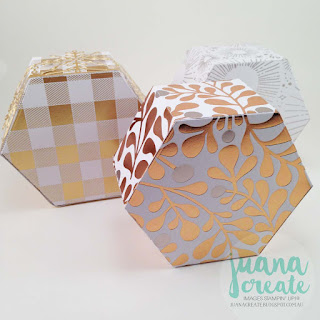
Hello and welcome to the Stamp Review Crew's second blog hop for August. Today we are showcasing the Window Shopping stamp set and the coordinating Window Box thinlits dies. You can click on the banner above and will take you to the main page of the hop in case you get lost. The hexagon box is the wow factor of this set and can be dressed up for any occasion! I have made three various themed gift boxes using both the sentiments from the set and a new bundle from the holiday catalogue called 'Snowflakes Sentiments' with the coordinating Swirly Snowflakes' thinlits dies. I have also used the new 'Year of Cheer specialty designer series paper' which is also from the holiday catalogue and not only does it have the right thickness for the box but it also comes in a gorgeous array of foil designs in gold, silver and champagne. The perfect accompaniment to this set. These fabulous new sets can be ordered on the release of the holiday catalogue on1st September 2017.

Here are the themed gift boxes... Thank you, Birthday and Christmas.


I have colour coordinated each box with the Year of Cheer specialty dsp using Silver, Gold and Copper heat embossing to match. The Window Box thinlits dies uses up 2 sheets of 6x6 dsp and can make two boxes out of one 12x12 dsp.

The Happy Birthday and Make A Wish sentiments are from the set and have used vellum to give a transparent overlay allowing it to still stand out without losing the lovely design of the patterned paper underneath. This vellum layering has been applied to each box. Tombow liquid glue has been used and by manually wiping it to a give thin coat onto the vellum helps to hide the traces of glue when dried. 


The swirly silver foil accent is from Swirly Snowflakes dies and the bow is created using the bow punch builder and they both help dress up the box. The same patterned dsp is used and helps to unify the whole design and a great way to use up all the scraps or off cuts. 


This is a Christmas gift box idea that uses the lovely sentiment from 'Snowflakes Sentiments' set and gold heat embossed on vellum to match. It has been die cut out using The faux stitched circle from Stitched Shape framelits circles and adding a nice interest. The gorgeous die cut snowflake is the new Foil Snowflakes from the holiday catalogue and is part of the Year Of Cheer suite.


The additional gold foil snowflake die cuts are from the Swirly Snowflakes dies and just really steps up the box design with the intricate and ornate die cut. Two die cuts have been used to wrap around the hexagon box with score tape at the base and trimmed at the ends where they meet up. The snowflake beside the sentiment are actually two separate die cuts and  have layered on top of each other to add dimension and fullness. Foam dimensional has been used to adhere all the layers and still providing the raised popped up appearance.


Lasty, the special floral thank you gift box sentiment from the Window Shopping set that has been copper heat embossed on vellum to match. The Year of Cheer dsp totally compliments the hexagon boxes, the organic designs such as the florals and the starburst works better to give a seamless all round look. Whereas the geometric tartan is hard to line up if you want the design to flow all around the sides. However the addition of the snowflake border helps to conceal it. These are the back of each box and aren't the foil dsp just divine? 


I hope you have enjoyed and found inspiration. This set is truly versatile and can be combined with many great sets both new and old to give a personalised custom made look to suit any occasion. Be sure to continue to hop along and see all the wonderful projects for more inspirations. Next on the blog hop is the wonderful and talented Karen Gooch. Enjoy the rest of the hop and thank you so much for stopping by. 'Til next time Happy Crafting! 


Thursday 17 August 2017

Stampin' Dreams Blog Hop - Favourite In Colour


Hello and welcome to the Stampin' Dreams Blog hop. The theme for this hop is 'Favourite In Colours', as they are all beautiful I have went with all of the them. The 2017-2019 In Colours all work so well together.

A bouquet of flowers using the Jar of Love set was a perfect way to show all these lovely colours. Rather than just creating a 2D card front I have borrowed the idea from a card that Kelly Marie Alvarez created from Lawn Fawn using the Fab Flowers set as a standing flowers in a jar shaker card. It just looked so unique and utterly fabulous! The Jar of Love has the same design possibilities.  


The colours used are: Powder Pink, Berry Burst and Fresh Fig for the flowers. Tranquil Tide, Lemon Lime Twist for the stems and leaves. Memento Tuxedo Black ink for the jar, banner and sentiment.

All  the elements have been die cut and layered and adhered with Tear and tape as well as foam dimensionals to add depth and layers.

Thoughtful Banners set has been used for the banner image and has been cut out using the coordinating Duet banner punch.


Shaker card elements include, the window acetate panel and foam adhesive strips for the inner wall recess to contain all sequins. Sequins used are a retired set that I have on hand and adds a great touch of colour. 


Partial die cutting of the tall jar has been done to create the card base that is top folding. To create this, have the top of the jar die overhanging over the top fold of the card so that it doesn't fully cut all the way. It creates the cutest little top folding note card that you can add a personal message inside and allows the jar of flowers to stand up for display.


To neaten up the back and add stability to the arrangement, I have used the Vintage Leaves set and coordinating dies to cover up all the smaller die cut leaves and flowers. They have been stamped in Lemon Lime Twist and Tranquil Tide and can just see the tips from the front. 

To dress up the jar I have used linen thread to tie a little bow. The Fine Tip glue pen is a perfect touch to add glossy accents to the flowers and the sentiment that has been fussy cut out to give it a 3D look.


I hope you have enjoyed and found inspiration. The Jar of Love is such a great set and so accommodating for all the gorgeous In Colours. Be sure to continue to hop through the list below to see all the creative projects. You don't want to miss any! 

Thank you so much for stopping by, 'til next time - Happy Crafting! :)


Wednesday 16 August 2017

Tully's Little Cat Agenda - Many Thanks Card


Tully's Thank You Card

Hello and welcome. I just wanted to share this special Thank you card to give to the lovely veterinarians who took care of Tully when he went to get his eyes check from a scratch accident to his left eye last week. Thank goodness Tully is now getting better and it's all thanks to the vet's prompt and helpful assistance. 

To show our appreciation we made this cute cat card inspired by the super talented Nichol Sphor, I just absolutely love her work and the card she made was just WOW! I have used the same design and tweaked it a little bit to suit and have mainly used cats!


The Little Cat Agenda set from Mama Elephant is a perfect thank you card from Tully. All the cats have been coloured in with Copic markers for quick and easy colouring. The matching dies have also been used to cut them all out. 

The new Mama Elephant Grid Window creative cuts die has also been used to create the stunning frame and compliments the Little Cat Agenda set. White fun foam is used underneath to mount it up to give an even raise and Whisper White cardstock has been used for the frame.


The background has been ink blended using Peacock Feathers and Twisted Citron Tim Holtz distress inks on Strathmore Bristol smooth cardstock. I didn't apply the water droplets effect as it's a hit and miss for me and need more practice with it hehe. 

The sentiment is from Mama Elephant's Many Thanks set and have been white heat embossed it on Basic Black cardstock. The speech bubble is a retired Stampin' Up! set called Word Bubbles Framelits and have ran it through the Big Shot twice by partially die cutting as well as manual cutting to extend the shape.

I have used the Stampin' Up fine tip glue over the Thank You sentiment as well as all the cute little objects that each cat are holding to give an extra dimension and interest.

I love how this card has turned out and will be a lovely Thank you card to give to the dear vets who looked after Tully. Their work truly makes this world a better place. Thanks also to Nichol Sphor for the inspiration, her talent is just amazing! I hope you have enjoyed and found inspiration. Thank you so much for stopping by, 'til next time - Happy Crafting! :)  


Sunday 13 August 2017

Crazy Crafters Blog Hop with special guest Martha Inchley


Hello and welcome to the Crazy Crafters Blog Hop with special guest Martha Inchley
Martha is part of the Artisan Design team and her work is absolutely stunning. Martha is also part of the Stamp Review Crew and is such an honour to work with her. 


Today I have chosen to CASE - Copy and Selectively Edit, one of my favourites - the card in a box, that Martha has created using the 'Lift Me Up' stamps and dies set - what a stunner it is too! I love everything about her card in a box and may Case the exact same design for another personal project, as the patterned paper is now retired and was from last year's Sale-a-bration. 
You can click here to see this gorgeous project from Martha's blog.


Here is the card in a box using the cute and fun 'This Little Piggy' set and a few images from the 'Garden Girl' set to complete the garden scenery. I have also used a new patterned paper from the upcoming new Holiday catalogue called Merry Little Christmas designer series paper. It's a gorgeous set of patterned paper and have went with the tartan design for a fun look. It is a Thank You card and have taken the sentiment from 'One Big Meaning'.   


The base card is Olive Green cardstock so that it will match with the Merry Little Christmas dsp as well as to complete the green hillside look. The little hills has been created using the largest oval shape from Stitched Shapes framelits using Wild Wasabi cardstock and have cut it in half to utilise every piece. It's the perfect little platform for each piggy to stand on and give so much dimension and  the faux stitching adds a nice interest.


All of the images have been coloured in with Copics and stamped with Memento Tuxedo black ink and have been fussy cut. The sky background panel is a little ink blending with Soft Sky on Whisper White cardstock. The sentiment has been white heat embossed on Basic Black cardstock and mounted on fun foam to give an even raise. There's a little added die cut dotted detail on the top using the the new dotted border die from Swirly Snowflakes thinlits dies from the new Holiday catalogue. I decided to tie the flaps of the card in a box with Basic Black bakers twine to give a neat all round look.  Here are the angled views of the card in a box...


The back is kept relatively simple with some space to write a personal greeting and have popped in the cute flowers from Garden Girl and isn't that designer paper just divine?


Here it is without the bow as an alternative and folds perfectly flat with or without the bow.


I hope you have enjoyed and found inspiration. The card in a box is such a fun card fold and truly brings the images to life and creating the little scenes is so much fun. Thank you so much Martha for the inspiration. Be sure to continue to hop around and follow the list below to see more wonderful and creative projects from the Crazy Crafters team as we Case Martha's gorgeous cretions. Enjoy the rest of the hop and thank you so much for stopping by. Until next time - Happy Crafting! :)


Monday 7 August 2017

Stamp Review Crew - This Little Piggy


Hello and thanks for your patience. I completely had the time zones all wrong with the scheduling of this post, but no matter, the show must still go on hehe. Welcome to this month's Stamp Review Crew. We are featuring the cute 'This Little Piggy' set. I love this set so much and have had so much fun using this set. The Little Piggy adventure continues in this new project... Click here to see the other cards I have made using this set. 

I have went with the flying pig image, as I haven't used it before. What better way to showcase her flying among the clouds than in a pop up card in a box.


I have used several products to complete this cute scene and they are; the clouds stencil from 'Pattern Party Decorative Masks' pack with 'Embossing paste' for the clouds background and 'Up & Away' thinlits for the die cut clouds. Lastly the rainbow has been created using Mama Elephant's Rainbow High Creative cuts die. It's a great addition and fits perfectly in the card in a box.

Colouring mediums used are Zig Clean Color brush markers on the rainbow and flying pig on the front and Copics on the back. I have also tried out Strathmore's Bristol smooth cardstock as it's been recommend for use with Zig Clean Color brush markers and is perfect for both water and alcohol based markers.

Pool Party cardstock used for the construction of the card in a box. Whisper White for the die cut clouds and the panel on the back of the card in a box. 

Flying pig on the front has been stamped in Versafine Onyx black ink for watercoloring and Memento Tuxedo black for the back for Copic coloring.  

Pool Party ink used for the sentiment on the die cut cloud and the ink blending on the back for the sky background.

White heat embossing used for the sentiment on a strip of vellum and the clouds on the back.

Here is a couple of angle shots of the card in a box with the cute flying pig over the rainbow.

...If little blue birds can fly over the rainbow, then why, oh why can't a cute pig? lol. :) 


The back of the card has been created with using a mask over the pig with a low tack paper over the top similar to a post it note and then white heat embossed the clouds from the set and have applied an ink blending in Pool Party ink. 


The card folds flat and can fit in an A2 or C6 envelope, ensuring that the elements it stays within the panels. I have used Stampin' Up! clear medium envelopes so that the design can be seen. It's all ready for mailing. :) 


I hope you enjoyed and found inspiration. It has been so much fun creating customised scenes for the Little Piggy, it's such a versatile set and the creativity is endless. Be sure to check out all the Stamp Review Crew's creative projects for more inspiration. Next up on the blog hop is the wonderful and talented Nikki Spencer, she has a treat in store. Enjoy! 

Thank you so much for stopping by, 'til next time - Happy Crafting! :) 


Thursday 3 August 2017

Creative Circle August Blog Hop - Birthday Bash theme


Hello and welcome. I'm so excited to be taking part in the Creative Circle blog hop as a design team member. I was so honoured when Liz Holloway invited me to join and such a great opportunity to be part of a lovely group of ladies who are Stampin' Up! demos from around the world.  

The theme for this blog hop is 'Birthday Bash', and have used a personal favourite the 'Birthday Delivery' bundle for this fun theme.

I have created a two gift box set of cards containing four cards and envelopes in each one. 
Here they are...


I have used the lovely 'Birthday Memories' dsp and have die cut and fussy cut all the cute images as a starting point. It would have been great if the bundle came with dies for all the images to make it easier especially for mass producing. But if you're patient fussy cutting isn't so bad hehe. 


The marching animals are so cute that have used them for one of the gift box sets. Here it is...

Products used: 
• Birthday Delivery bundle
• Birthday Memories designer series paper
• Seaside Textured Impression Embossing Folder for the sky background.
• Swirly Scribbles thinlits
• Crumb Cake, Olive Green and Pool Party cardstock
• Bow Builder punch
• Memento Tuxedo black ink
• White embossing powder
• VersaMark
• Glitter enamel dots (Olive Green)


The seaside embossing folder is a great way to add movement to the background and looks like wind. The hillsides are the negative die cut from the wave from 'Swirly Scribbles thinlits' and gives a perfect wave shape and consistent look throughout. 


Here is the second gift box set.

Products used:
• Foil Frenzy specialty designer series paper
• Birthday Delivery bundle
• Stitched Shapes framelits
• Layering Circle framelits
• Mini Treat bag thinlits (bow)
• Bow Builder punch
• Lemon Lime Twist, Berry Burst, Tangerine Tango and Soft Sky inks


This was a lot of fun to create and have colour coordinated each element. The use of foam dimensionals help to pop up the layers and adds more depth and dimension. I opted to die cut the mini bow from Mini treat bag thinlits to keep everything flat and less bulk as well as colour coordinate with each card. 


These cards were a lot of fun to make and I hope you have enjoyed and found inspiration. Make sure to continue to hop around and check out the rest of our team's creative projects for more inspirations. Thank you so much for stopping by, 'til next time - Happy Crafting! :)